
Bodywork
The Fury
There are basically three styles of Fury, the Standard body with the standard bonnet, the Spyder body with the standard bonnet and both body styles with the Le-Mans Bonnet.
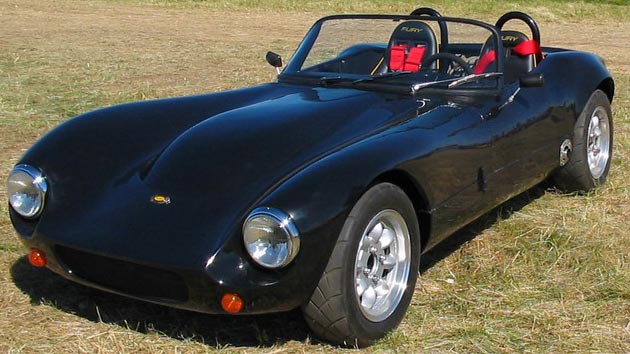
The Standard body and the standard bonnet
The standard body incorporates a full screen taken from a Lotus Elan S2, slightly narrower rear arches and doors. The standard bonnet has the headlamps forward of the front wheel arches and a straighter line of these arches.
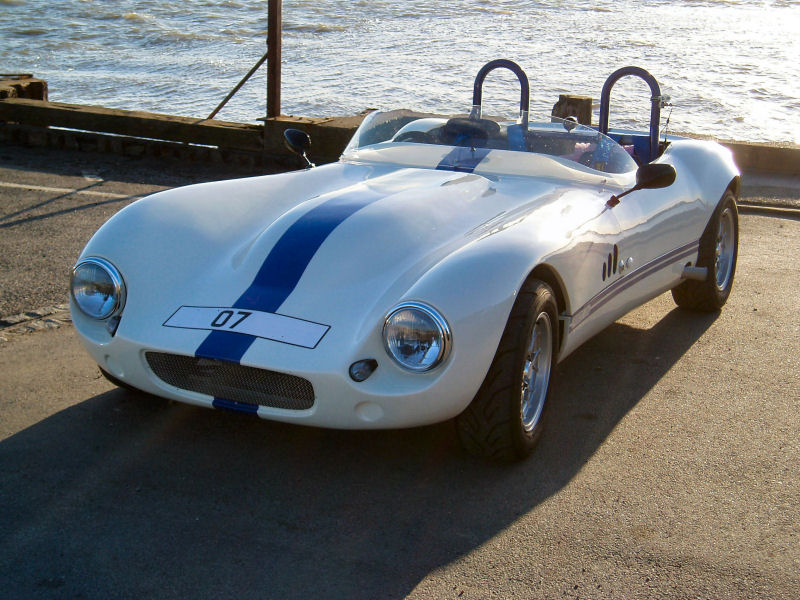
The Spyder body with the standard bonnet
The Spyder body has a fly screen, slightly wider rear arches and no doors. The standard bonnet has the headlamps forward of the wheel arches and a straighter line of these arches.
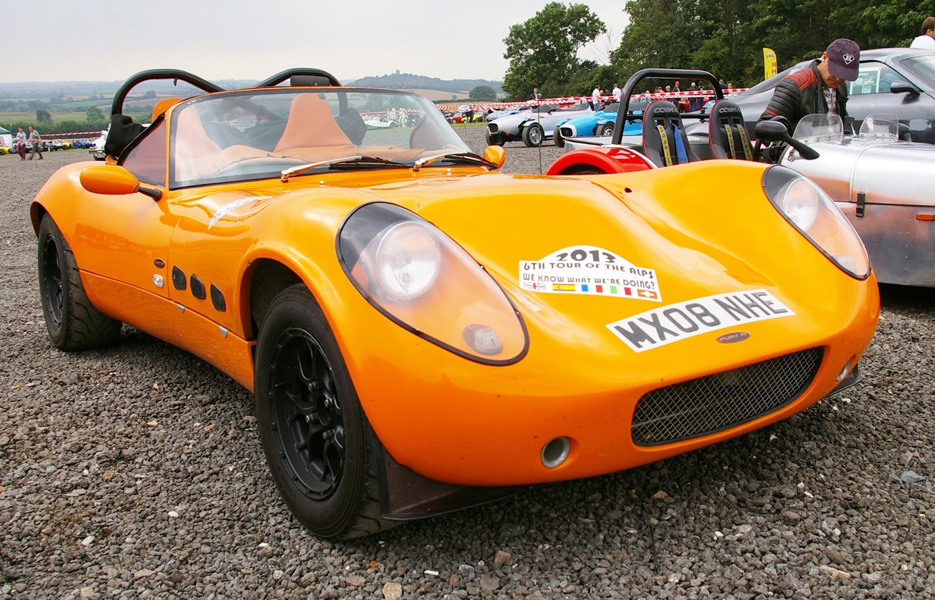
The Spyder body with the Le Mans bonnet
This is a latest version of the Spyder body with a full windscreen and the Le Mans bonnet
The Spyder body has a fly screen, slightly wider rear arches and no doors. The standard bonnet has the headlamps forward of the wheel arches and a straighter line of these arches.
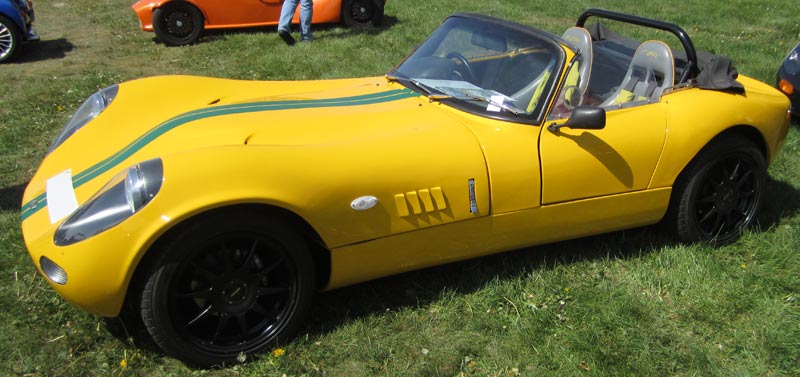
The Standard body with the Le Mans bonnet
The original body style with doors and full windscreen and the Le Mans bonnet, this one has the optional hood fitted.
The Spyder body has a fly screen, slightly wider rear arches and no doors. The standard bonnet has the headlamps forward of the wheel arches and a straighter line of these arches.
Back to top
Where do I start...
-
When I originally ordered the Chassis I decided not to order the bodywork because I thought it best to wait, one until I had the money for it and two having somewhere to store it without it getting damaged. Fibreglass bodies can sag if you store them on their end so at the time, I thought that was a good reason not to get the bodywork when I got the chassis. As it was, it proved to be a wrong decision with regards to time but at least I didn't have to worry about it becoming damaged.
Having got the chassis to a point where I could soon see the need for the bodywork, I contacted Steve at Fury Sports cars to place my order. What I wanted was the Standard body with doors and the Le Mans bonnet but having spoken to Steve, he told me that the Standard body mold had become damaged when the last body was made and he would have to have a new one made which would take him several months!
Throughout the next eight months I continued to speak to Steve and get updates on progress and unfortunately there was none. Not only had the original mold become damaged and he could not afford to have a new one made at that point in time but also, the original company he was using to make the bodywork were messing him around so he was on the lookout for someone else to take it over...more waiting.
With the news that he was no nearer getting the Standard body mold made and sourcing a new supplier for the body I was getting really worried that I would end up with a Chassis and have no bodywork to put on it and started asking on Locostbuilders if anyone knew of a used body tub if I were to need it but even this proved fruitless.
Roll on another six months and Steve managed to find a replacement supplier for the fibreglass work so I made the decision to get the Spyder bodywork and the Le Mans bonnet while I could as I had no idea how long I could be waiting for the Standard bodywork.Finally in November 2015 after a few hiccups with the sidepods and almost two years after originally ordering it, the bodywork was finally ready for collection. As soon as I had a day off work I booked a van and made the trip down to Kent to pick it up. Now a trip to Fury is never and in and out job, there is always the compulsory chat about all things kitcar/Fury plus the opportunity to have a look over the cars he has at the time and get some ideas for my build. As it was, it turned out to be a 10 hour round trip but well worth it to finally have the bodywork and the prospect of making some real progress.
sml.jpg "Spyder Bodywork and Le Mans Bonnet - Click for larger image")
sml.jpg "Spyder Bodywork and Le Mans Bonnet - Click for larger image")
sml.jpg "Spyder Bodywork and Le Mans Bonnet - Click for larger image")
sml.jpg "Spyder Bodywork and Le Mans Bonnet - Click for larger image")
sml.jpg "Spyder Bodywork and Le Mans Bonnet - Click for larger image")
Once I finally had the bodywork I could place it on the chassis, confirm the positioning and route the wiring which I had been waiting to finish terminating once the body was in place. As it was, the route I had chosen for the main loom and engine cabling just wasn't going to work so I was glad I hadn't completed that while waiting. With a workable route now chosen the work of finishing off the wiring terminations and clipping it down began, just the question of what to do with the bodywork while this happened. A neat little solution saw the building of a shelf to lift it off the floor out of the way to prevent it getting damaged. Ironically I suppose I could have done this originally to store the body, but hindsight is a wonderful thing...
_sml.jpg "Bodywork trial fit - Click for larger image")
_sml.jpg "Bodywork trial fit - Click for larger image")
.jpg "Wiring with the body in place and mounted on MDF board - Click for larger image")
.jpg "Wiring with the body in place and mounted on MDF board - Click for larger image")
.jpg "Mini garage built to store bodywork away - Click for larger image")
.jpg "Mini garage built to store bodywork away - Click for larger image")
.jpg "Mini garage built to store bodywork away - Click for larger image")
.jpg "Mini garage built to store bodywork away - Click for larger image")
.jpg "Mini garage built to store bodywork away - Click for larger image")
.jpg "Mini garage built to store bodywork away - Click for larger image")
With the routing of cabling now sorted I focused on getting the body tub positioned in the right place so that it sat squarely between the wheels and the front wheels turned in the wheel arches without contacting the side pods or the bonnet. This was a little tricky but eventually taking my time and with the use of masking tape to hold the side pod in place, I had it positioned where it needed to be. With this all marked up I could get round to fixing the rear boot liner panel in place and think about bonding the body tub to this. I also made a cutout in the nearside side pod for the exhaust to sit in. The bonnet will need the lip where it joins the tubs cutting down a bit to allow it to seat properly but I will wait to do that until the tub is securely fastened down.
.jpg "Main body tub, side pods and bonnet trial fit - Click for larger image")
.jpg "Main body tub, side pods and bonnet trial fit - Click for larger image")
.jpg "Main body tub, side pods and bonnet trial fit - Click for larger image")
.jpg "Main body tub, side pods and bonnet trial fit - Click for larger image")
.jpg "Side pod cutout for exhaust manifold - Click for larger image")
.jpg "Side pod cutout for exhaust manifold - Click for larger image")
.jpg "Side pod cutout for exhaust manifold - Click for larger image")
With the boot liner now securely fastened down to the chassis, cut down to size to allow the body tub to sit at the correct height and a hole for the fuel hose access I could start to fix the body tub in position. This is done by bonding the boot liner section to the body tub with fibre glass mating and resin. While I was at it I added some around the role hoop attachment point to keep out water ingress.
_sml.jpg "Nearside rear of pod with the bootliner cut down prior to bonding to main body tub - Click for larger image")
_sml.jpg "Nearside rear of pod with the bootliner cut down prior to bonding to main body tub - Click for larger image")
_sml.jpg "Nearside rear of pod with the bootliner bonded to main body tub - Click for larger image")
_sml.jpg "Nearside rear of pod with the bootliner bonded to main body tub - Click for larger image")
_sml.jpg "Cutout around roll hoop mounting bonded to prevent water ingress - Click for larger image")
_sml.jpg "Offside rear of pod with the bootliner bonded to main body tub - Click for larger image")
_sml.jpg "Offside rear of pod with the bootliner bonded to main body tub - Click for larger image")
_sml.jpg "Cutout around roll hoop mounting bonded to prevent water ingress - Click for larger image")
Back to top
.jpg "Spyder Bodywork and Le Mans Bonnet - Click for larger image")
.jpg "Spyder Bodywork and Le Mans Bonnet - Click for larger image")
.jpg "Spyder Bodywork and Le Mans Bonnet - Click for larger image")
.jpg "Spyder Bodywork and Le Mans Bonnet - Click for larger image")
.jpg "Spyder Bodywork and Le Mans Bonnet - Click for larger image")
.jpg "Bodywork trial fit - Click for larger image")
.jpg "Bodywork trial fit - Click for larger image")
.jpg "Wiring with the body in place and mounted on MDF board - Click for larger image")
.jpg "Wiring with the body in place and mounted on MDF board - Click for larger image")
.jpg "Mini garage built to store bodywork away - Click for larger image")
.jpg "Mini garage built to store bodywork away - Click for larger image")
.jpg "Mini garage built to store bodywork away - Click for larger image")
.jpg "Mini garage built to store bodywork away - Click for larger image")
.jpg "Mini garage built to store bodywork away - Click for larger image")
.jpg "Mini garage built to store bodywork away - Click for larger image")
.jpg "Main body tub, side pods and bonnet trial fit - Click for larger image")
.jpg "Main body tub, side pods and bonnet trial fit - Click for larger image")
.jpg "Main body tub, side pods and bonnet trial fit - Click for larger image")
.jpg "Main body tub, side pods and bonnet trial fit - Click for larger image")
.jpg "Side pod cutout for exhaust manifold - Click for larger image")
.jpg "Side pod cutout for exhaust manifold - Click for larger image")
.jpg "Side pod cutout for exhaust manifold - Click for larger image")
.jpg "Nearside rear of pod with the bootliner cut down prior to bonding to main body tub - Click for larger image")
.jpg "Nearside rear of pod with the bootliner cut down prior to bonding to main body tub - Click for larger image")
.jpg "Nearside rear of pod with the bootliner bonded to main body tub - Click for larger image")
.jpg "Nearside rear of pod with the bootliner bonded to main body tub - Click for larger image")
.jpg "Cutout around roll hoop mounting bonded to prevent water ingress - Click for larger image")
.jpg "Offside rear of pod with the bootliner bonded to main body tub - Click for larger image")
.jpg "Offside rear of pod with the bootliner bonded to main body tub - Click for larger image")
.jpg "Cutout around roll hoop mounting bonded to prevent water ingress - Click for larger image")