2014
Click links below for the relevant section
October - December 2014
-
Ok, me thinking that I would have more time to work on the car since moving jobs has not materialised really since I have been getting stuck in and learning the new role which is quite diverse compared to my previous job and also I have been covering for someone who was badly injured so time hasn't been on my side. I have also been doing a few websites for people which although they do take up my spare time it does help to fund the project and that is important as I will be spending a fair bit soon on the bodywork.
Propshaft
Most of the jobs I have done over this period have been carrying out research on parts and components, one of them being the propshaft which was ordered and delivered in the space of about a week from Dunning & Fairbank who have a good reputation on the Locostbuilders site. A quick trial fit and all looks good I just need to get some new bolts for the Diff end and also look into making a Prop catcher should the worst happen! I just now need to work out how to attach it to the chassis avoiding the brake and fuel lines and handbrake cable.
Bodywork Update
Just before Christmas I contacted Steve again at Fury Sportscars to find out how he was getting on with the bodywork....he's not!!!. Now despite originally leading me to believe the mold was complete and that my bodywork was in production that was apparently not the case. The people he uses to produce the fibre glass components have not progressed with the mold and will not carry on until Steve pays them to continue and he can't afford to because the company is struggling with the lack of orders, so after 10 months of waiting for the mold to be completed and my bodywork ordered I am still no nearer to getting it.
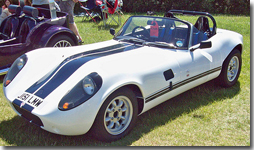
Now the original plan was to have the Standard bodywork with the doors so I could eventually try and produce a hard top roof system but now I am seriously worried that the company is in trouble and I will never get any bodywork so I took the decision to order the Spyder bodywork with the windscreen as I can then at least make some more progress. So the order is placed once again, I just have to wait and see how long this will take....
Back to top
July-September 2014
-
Well little progress has been made over the past few months due to me changing jobs, a family holiday and the various jobs needed around the house while the good weather has been about. The good news is that the new job should allow me more time to spend on the project and also I do not have to travel as far each day so should have some energy left at the end of each day. Over this time I have spoken to Steve at Fury Sportscars who says that the mold is complete for the bodywork and is currently being laminated. He also promised that I should be able to have my bodywork by Christmas which is great news as not having the bodywork has really been holding up further progress as I want to get this before finishing the final terminations for the loom.
Radiator and Fan
One job I have managed to progress is getting the radiator and cooling fan and mounting this to the chassis. Having spoken to Fury Sportscars I had been told that I needed a MkII Polo radiator which would be easy to get, until I found out there are about four different sorts. A bit posting on the Locostbuilders website and the Jeremy Phillips Sportscar Club website confirmed that the best one to get for the Fury with a Zetec engine is the one for the 1.3 Polo Part number VW303. To go with the radiator I also purchased a 12 inch fan and also a temperature switch from a Ford Focus Mk1 ST170 as this works at the right temperture range for the Zetec and has the correct thread size to fit the Polo radiator.
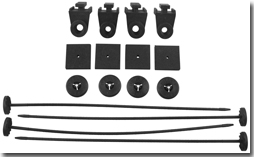
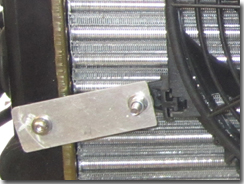
The fan was supplied with mounting kit that pushes plastic rods through the fan matrix and some plastic retaining clips but I have heard stories that these eventually can wear their way through and drop the fan and also cause damage to the matrix so I was keen to avoid using these. In the end I mounted the fan on some small rectangular brackets which just screw into some mounting points already moulded into the radiator sides. This held the radiator just slightly away from the matrix fins and I used the foam pads to provide some extra protection just infront of the mounting points of the fan.
To mount the radiator and fan to the chassis there are two mounting brackets welded to the chassis with holes pre-drilled to accept the Polo radiator. One problem I did find with these mounts though is that the temperature switch point fouls the bracket so a small amount of the bracket had to be ground away and then reprotected to allow the switch to be fitted. In theory the radiator can mount straight to the brackets but I used a couple of thick rubber washers to provide a bit of vibration protect between the radiator and chassis. All that needs doing now is wiring the fan and switch to the elctrical system.
Back to top
June 2014
-
Seats
Whilst visiting the Kitcar show at Stoneleigh last month, I visited a few of the stands that had seats on to try them for size, both car wise and body wise and also to let Mrs Martin try the seats for size. After trying a couple is was evident there are great variations in quality when it comes to the seating and seeing as we would like to use the car for touring in europe once complete the comfort side will be important.
Now with the Fury being quite compact in this area there were only a few types that will fit the space and having looked at a few of the Furys in the Jeremy Phillips Club stand outside, the majority of seats fitted were the Cobra Roadster 7 seats. Doing some surfing on the net revealed that the style seen in these Fury's was no longer available and an updated version was now made. Having located a dealer close to my work I managed to bring a demonstration version home to try for size and to be honest they are a perfect fit and very comfortable, but also very expensive at almost £400 each!!!
Brakes
This month I also ordered the front brake pads, EBC Green Stuff Pads as they have a very good reputation for good performance and also minimal fade and reduced dust. With these fitted and the whole braking system re-checked for tightness I filled the system up with new fluid and got my able assistant Kieran to help me bleed all the air out of the system. He thought this was great fun once he understood the process and took great delight when finished of me pushing the car backwards and forwards and him standing on the brake pedal and watching me fly over the top! Another job finished or so I thought. Now the rear shoes had a chance to operate properly and the adjusters had got to their correct point, the hand brake was operating properly but it was evident that the little pulley wheels I had put on the chassis rail were not going to do their intended job and the cable just kept jumping off the pulleys when the cable went slack, time for a rethink.
What I came up with was a much simpler idea really and should do exactly what I need to prevent the handbrake cable from rubbing on the chassis rail. I basically made a roller out of 10mm aluminium tubing, put a length of 6mm threaded bar through this and then made a bracket top and bottom to hold it in place using the fixing points I had made previously. The cable is now free to role over this bar and move up and down as required as the cable goes tight and slack without the problem of rubbing against the chassis rail.
Exhaust
I have also had a call back from Mike at Tube Engineers Ltd in Market Rasen, letting me know that the silencer was finished and ready to collect. With a day off work booked, I drove up to Market Rasen with the exhaust manifold also in the car as Mike had said that he could have the Lambda Sensor boss welded on for me when they welded on the mounting tags for the exhaust.
Having a look around the workshop there were lots of jigs that were used to produce manifolds for all sorts of cars and on the bench while I was there, a Ronalt manifold was being made, a straight six maifold out of stainless tubing. Before going up I had measured where abouts on the chassis I thought the mounting brackets should go and told Mike who sorted these out front and back which should take some strain off of the manifold.
At the moment I havent made the brackets to hold the exhaust as it will probably be best to wait until I have the sidepod to know if I need to shorten the manifold slightly to fit the silencer in the pod.
First Start
With the silencer now mounted, the manifold attached and the wiring connected to the engine I could resist trying to get the engine running. After checking the engine over to make sure all was tight, the plugs were in properly, the oil level was correct and all the wiring attached correctly I disconnected the ignition plug and cranked the engine over a couple of times to make sure the oil had circulated within the system. Having connected the ignition plug back up I got Chris to film me as we went for an engine start....and it fired up first time without any cough or splutter just straight into running, not bad seeing as it has sat in the garage for almost three years and only had a cam belt change and a bit of a clean up.
Back to top
April - May 2014
-
Electrics
Most of this month has been spent finishing off the electrics as far as I can without having the bodywork, hopefully soon I will be able to pop into Fury Sportscars and see how Steve routes the wiring loom so I can try and finish it off the best I can.
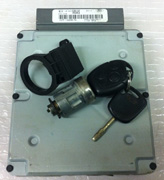
I did manage to get it to the point where I connected the battery and checked out that the Ford ECU I am using worked, along with the PATS system (immobiliser) and the fuel isolator relay. If you are removing the ECU from a Ford Mondeo or similar, to use with a Zetec remember to also get the keys, barrel lock and PATS Sensor unit which is located around the key barrel. These items are matched and the ECU will not activate with the right combination of key, ECU and PATS Sensor unless you were to get them reprogrammed which is quite expensive. Switching on the ignition for the first time the fuel pump turned over the PATS LED stayed steady meaning the the system was accepted and turning the key to position 2 the starter motor turned over, turning the engine over for the first time in a while. With that now all working I need to get the fuel system finished off and maybe try and get the engine running.
Fuel Tank Sender
I have decided on using ETB gauges for the car so to suit I had to buy an ETB fuel gauge sender unit to match. The sender comes with an arm and float that is far too long for use in my fuel tank (and most other kits I would expect) so there are two options on what to do with regard to shortening it. One, is can be cut short and rejoined using some electrical block but the problem is that the screws will need to be lock to prevent them coming loose and the arm is in a fuel environment so thread lock would have to be able to withstand this. The other option and the one I chose was to shorten the arm while retaining the arc of the arm by putting in a series of 'z' shapes. I thought this would be best and without the worry of the arm dropping off in the tank, however the first bend went well while it could be held in a vice but the rest were hard going as the arm was made from stronger material than I was expecting. Eventually after some trial and error I managed to get the bends right so the arc swing of the arm allowed for the arm to reach the top of the tank and also almost the bottom leaving a centimetre so I had a small element in reserve.
With the arm now the correct length, I drilled a 40mm hole in the top of tank and then the holes for locating the Rivnuts which would be used to screw the sender into the tank.
Wheels
I have been just generally looking around at wheels for the car and had decided that the Minilite style wheels would look good and are available for reasonable prices, however recently a set came up on the Locost Builders website, located in Bourne not far from me and basically new apart from two had had a set of tyres fitted but had never been used. The only problem was that the offset of the wheels (how far the mounting point is offset from the wheel centerline) was not quite right, but after posting some details on the Locostbuilder website I was informed that the offset could easily be cured with a set of 6mm spacers on the front and the rears were only 2mm out so would probably be ok. having put them on the chassis once collected they do look great but I will wait until I am close to getting the bodywork before getting tyres fitted to stop them getting damaged.
Other Jobs
Being May it saw my annual pilgrimage to the National Kitcar Show at Stoneleigh Park. there were all the usual stands filled with new kits and many of the old familiar faces but also the trade stands where you can pick up those small items that you seem to spend the year looking for only line only to see that companies want to charge you £5 postage to send a £1 part.
While there I also had a look at the few Fury's there were and took some images of the mounting of the indicators that many Fury owners fit. These are MGF front indicators and they are the perfect profile to suit the front of the Fury's and on a recent trip to my local scrap yard I had found a couple of unbroken units which I picked up for a couple of pounds, only these are the original orange version and not the clear lens that most seem to fit. Whilst at the scrap yard I also picked up two side repeater indicators from a Vauxhall Corsa and two door lock units from a Metro which Steve tells me are the best unit for the Fury's doors.
I have also spoken to Steve about the exhaust system and he put me in contact with the people he uses who are actually quite close to me. The unit they make has been recommened by quite a few people as being well built, re-packable and also fairly quiet which is essential for the IVA requirements. Having spoken to Mike at Tube Engineers he said they can make the exhaust system with the CAT included inside the silencer so it keeps it all neat and also should help to soak up some of the heat that may build up in the sidepod.
Back to top
January - March 2014
-
Clutch Cable
I have managed to get a little time in the garage again and so decided to have a look at the clutch connection. Having had a few recommendations I went for the Mk II/III Capri clutch cable as I was told that was slightly longer than the Escort one so wouldn't have such a tight bend, this is a Quinton Hazell QCC1148 or you can try BC1148 which is the Part Number my local motor factor gave me. The outer is 793mm long and the Overall length is 1105mm.
After collecting the cable I realised I would have another problem, and then when trying to fit it there was another. First of all the bellhousing end connected fine as you would expect but at the pedal end the cable has an eye end and the pedal is just a bar with a hole in so I would need to come up with something to connect the two, and the other problem was that the cable was about 80mm too short.
I came up with a plan to get a turnbuckle that would allow me to connect both the ends together and also make up the gap for the 80mm shortness but on looking around there were just no turnbuckles that short and certainly none that had the correct connections that I needed. After some more searching I found somewhere that did a clevis fork end with a pin in, one with a long end to give clearance over the pedal and the other short end for the cable. To connect the two I bought some 6mm bar and cut that to length to connect the two clevis forks and be able to adjust the cable at both ends. Over all it has worked out quite well, to do the adjustment you have to disconnect one end which you do not have to do with a turnbuckle but at least I have some sort of adjustment.
Pipe Clamp
Another quick job I have managed to do is attach some double cable clamps that I ordered before the extension work started but have only now managed to fit. The first one which has 12mm holes is to clamp the fuel hoses together that holds the high pressure fuel filter and fuel return line. The other with the 8mm holes is used to clamp the two solid fuel lines together but also to keep them separated to stop them from rubbing together.
Wiring Loom
With a couple of days planned off work I decided that I couldn't put off any longer getting the loom fitted, or at least put into position and checked for functionality. It can't be fully fitted and cut to the complete final lengths until the bodywork is in place but this way out could get things up and running and check out the circuits. The switches that connect from the steering column I had already wired up and connected plugs so these can be disconnected should I need to.
Next I laid the loom out and reading the guide provided by Alan at Premier Wiring Systems I labeled up each wire so I knew what it should connect to and then laid it out over the chassis to roughly workout how the loom would sit with the car. Next up I had the Ford ECU wiring look and stripped that back to the bare wires, checking the pins from the ECU 104 pin plug with that provided by Warren to the other plugs in the engine loom.
I also stripped off the tape around the car side plug(c2513) that connects to the engine loom and produced a guide of the wiring colours so I would be able to see what connected to where.
Once I had a rough idea of what needed to go where I laid the loom out over the chassis and started to place the wires where they needed to go and making rough terminations. I know they will all need to be finished off properly once the bodywork is in place but this way I can at least make some progress. While I was at it I also had some cables made up to connect to the battery and alternator which will run off to the battery on the offside in the side pod by the engine, at least that's where others have put them but this may change once I have the bodywork.
Bodywork #1
Seeing as I have mentioned the bodywork, before I started the wiring I phone Steve at Fury Sportscars and tried to place my order, the standard Fury body with doors and the Le Mans bonnet, Steve got back to me the next day with some bad news. The last time he had made a standard body the mold had become damaged when getting the body out and so if I wanted that body type he would have to make a new mold and plug...the earliest this would be is the end of the summer and then he would make the body from that!!! So that means it is going to be probably December 2014 at the earliest before I get the body shell which is going to put a severe delay on progress now.
To 2013


.jpg)
.jpg)
.jpg)
.jpg)
.jpg)
.jpg)
.jpg)
.jpg)
.jpg)
.jpg)
.jpg)
.jpg)
.jpg)
.jpg)
.jpg)
.jpg)
.jpg)
.jpg)
.jpg)
.jpg)
.jpg)
.jpg)
.jpg)
.jpg)
.jpg)
.jpg)
.jpg)
.jpg)
.jpg)
.jpg)
.jpg)
.jpg)
.jpg)
.jpg)
.jpg)
.jpg)
.jpg)
.jpg)
.jpg)
.jpg)
.jpg)
.jpg)
.jpg)
.jpg)
.jpg)
.jpg)
.jpg)
.jpg)
.jpg)
.jpg)
.jpg)
